

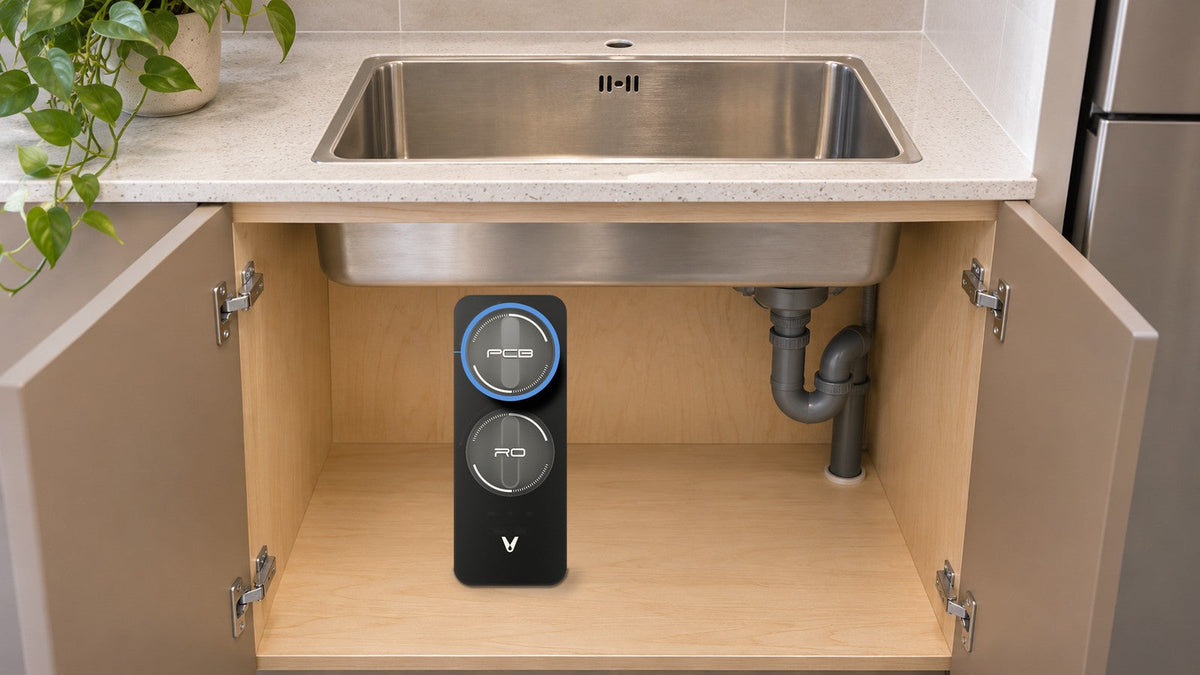
Measuring a small apartment kitchen for an RO system starts with the clear space beside the drain trap, then the door opening the unit passes through, and the positions of the outlet, drain pipe and faucet hole. The 5-inch-wide tankless body of the Viomi V6 PRO suits a narrow gap next to a trap or disposer.
A shortlist of compact systems for apartments with older plumbing and tap-water taste complaints is already covered in a guide to compact RO for small apartments.
Measuring the Cabinet the Way the Unit Goes In
Measure the cabinet from the outside in, in the order the unit will travel. Write each number down in inches.
| Measurement | Where to put the tape | Your number |
|---|---|---|
| Door opening width | Inside edge to inside edge of the face frame; on double doors, from the center stile to the frame on the side where the unit will go | |
| Door opening height | Top of the cabinet floor to the underside of the face frame | |
| Interior depth | Back of the face frame to the back wall | |
| Interior height | Cabinet floor to the lowest point above it, usually the bottom of the sink bowl | |
| Interior width | Side wall to side wall | |
| Front access | Clear floor between the door opening and the front of the spot where the unit will stand, with bins and bottles moved aside | |
| Tube route | Path from that spot to the cold valve, the faucet hole and the drain pipe, noting each corner the tubes turn and anything they would pass behind | |
| Cartridge access | Clear room on the side where the unit's cartridges come out |
The cartridge-access row depends on the unit. On the Viomi M1, the PCB cartridge twists and pulls out, and on the Viomi B6W, the cartridges pull out horizontally from the filter seat, so the room to record is on the side they come out.
The door opening is worth measuring carefully in sink bases with a fixed center stile between two narrow doors. Compare the opening with the unit's dimensions in the upright position it will stand in, and follow the path from the opening to the chosen spot, past the stile, the hinges and anything on the cabinet floor. The front-access and tube-route rows record the space around the unit once it is in place, so the front of the unit stays within reach and the tubes have a clear run to each connection.
Interior height needs measuring in the right place. The sink bowl hangs below the countertop, and on a deep single-bowl sink it can take several inches out of the cabinet's height right where the unit would stand. Measure from the cabinet floor to the bottom of the bowl, then separately to the underside of the countertop at the sides, where there is no bowl overhead.
Subtracting the Trap, Disposer and Shutoffs
A cabinet's interior dimensions describe an empty box. Most sink cabinets are anything but empty, and the space that counts is the clear rectangle left beside the plumbing.
Measure the drain trap first, the curved section of pipe that drops from the sink and turns into the wall. Measure from the side wall to the nearest edge of the trap, and from the back wall to the front of the trap. If there is a garbage disposer, measure the same way to its body, which usually hangs lower and wider than the trap. Add the cold and hot shutoff valves on the back wall and any water heater line or dishwasher supply that crosses the floor.
The result is one or two clear rectangles, typically on either side of the trap. Write each down as width × depth × height, and note what sits above it: the sink bowl, or the open countertop underside along the edge. Those rectangles, not the full cabinet, are what each unit has to fit into.
For an example of how this plays out, a sink base that measures 32 inches wide inside might leave a clear rectangle about 10 inches wide on one side of the trap and 9 inches on the other, once the trap and a disposer are subtracted. Those example numbers are what the next table works with.
Unit Footprints Next to Your Numbers
With the clear rectangles written down, compare them with each unit's published dimensions, adding the room each one needs for its tubing connections.
| System | Width | Front to back | Height | Room for connections |
|---|---|---|---|---|
| Viomi V6 PRO | 5" | 16.3" | 12.8" | Taken from the tube-route row of your sheet |
| Viomi V8 PRO | 5" | 16.3" | 12.8" | Same as the Viomi V6 PRO |
| Viomi B6W | 5.91" | 12.64" | 16.22" | About 1–1.5" above the unit for connectors, plus space for tubing |
| Viomi M1 | 6.4" | 17.1" | 15.9" | 2.0–3.9" behind the unit for tubing connections |
The Viomi V6 PRO and Viomi V8 PRO height is 325 mm, which converts to about 12.8 inches. Under a sink bowl, where height is short but depth runs to the back wall, their shared long, low case fits the space. A shallow cabinet with open height along the side suits the shorter, taller body of the Viomi B6W, and a cabinet with more depth takes the Viomi M1, with its tubing connections at the back.

| Example clear space (W × D × H, inches) | Situation | Units whose dimensions fit the example space |
|---|---|---|
| 10 × 19 × 13.5 | Beside the trap, under a deep sink bowl | Viomi V6 PRO or Viomi V8 PRO |
| 9 × 14 × 18 | Shallow cabinet, open height at the side | Viomi B6W |
| 10 × 22 × 17 | Deep cabinet, under the countertop edge | Viomi V6 PRO, Viomi V8 PRO or Viomi M1 |
The three spaces in this table are examples, not measurements from a particular apartment; replace them with the rectangles from your own sheet. Check, too, that the floor under the chosen rectangle is flat and free of a lip or a cutout, so the unit sits level.
Outlet, Drain Run and Faucet Hole Positions
The outlet and the water connections come next, measured from the rectangle you picked.
Begin the connection notes at the outlet: where it sits, whether it has a free socket, and whether a wall switch controls it. These Viomi RO units plug into a standard outlet with constant power on a GFCI-protected circuit, taking their own outlet where a garbage disposer uses a switched one.
On the drain side, the drain saddle fits over a 1/4-inch hole in the sink drain pipe, so look for a reachable stretch of that pipe and write down how far it is from the clear rectangle you picked. The concentrate tube runs from the unit to that point, so a rectangle close to the drain keeps the run short and tidy.
The faucet connection starts on the countertop. The drinking faucets on these Viomi units mount in a 1-inch to 1.5-inch hole, so check the sink deck for a spare hole from a soap dispenser or side sprayer and measure its diameter, and note the spot beside the main faucet that sits above the cabinet side where the unit will stand.
Last, find the cold shutoff valve on the back wall, since the feed water adapter connects to it. Note where it sits and whether it turns and closes fully.
With the outlet, drain pipe, faucet hole and cold valve marked, the sheet shows which side of the cabinet keeps the tube runs shortest. For the Viomi V6 PRO, Viomi V8 PRO and Viomi M1, the feed water adapter, drain saddle, tee fitting and drinking faucet come in the box, and each model has a step-by-step installation video.
If the Countertop Route Fits Better
Some apartment sink cabinets are taken up by a disposer, building pipes and a water heater line, while the counter has a free stretch of space. Where that is the case, the measurements change to the countertop.
Measure the free length of counter, the depth from the backsplash to the counter edge, and the height from the counter to the underside of the wall cabinets above it. Note the nearest outlet and whether a cord can reach it without crossing the sink. Then walk the refilling route. Where the tank lifts out to be filled at the faucet, measure the height the tank needs to clear the wall cabinets as it comes off the base, and the path from the counter to the sink with a full tank in hand. Where the tank is filled in place, measure the open space above the fill opening for a pitcher. Either way, the distance and the path between the unit and the sink become part of the daily routine.
FAQ
Should I measure with the cabinet doors open or closed?
Measure with the doors open for the interior and the door opening, and close them once at the end to check that nothing, including a tube loop or the power adapter, would sit where a door or its hinge swings.
What should I note on the sheet about older plumbing?
Write down whether the cold shutoff valve turns and closes fully, what the visible drain pipe is made of, and where the straight sections of drain pipe sit. Those three notes cover what the feed adapter and the drain saddle connect to.
What if the open space sits behind the trap instead of beside it?
Measure that rectangle the same way, from the trap to the back wall and from the floor to the lowest point above it. Then fill in the front-access row with special care, since the unit has to pass the trap on the way in and the front of the unit sits farther from the door.
How should a pull-out trash bin go on the sheet?
Measure the cabinet twice, once with the bin in place and once with it removed, and note which rectangle the bin occupies. That shows whether the bin and the unit can share the cabinet or whether the bin moves elsewhere.
Do I need my landlord's permission to install an under-sink unit?
In a rental, the sheet also has a line for written permission from the landlord or building management for the faucet and drain connections.
What if two units fit my measurements?
Then the choice moves from fitting to features, such as the display faucet on the Viomi V6 PRO and Viomi V8 PRO or the mineral stage on the Viomi M1. An overview of water filter options for New York City apartments covers how renters weigh those choices.
Matching Your Numbers to a Unit
Lay each candidate's footprint, with its connection room, over the rectangle closest to the drain and the outlet. A unit whose body fits there, with clear front access and short runs to the outlet, cold valve, faucet hole and drain pipe, is the one the measurements point to. When none fits, the second rectangle or the countertop measurements are the next place to look.
Share:
Chloramine Filters: Choosing the Treatment Location and Sizing the Capacity
How to Tell Whether One Filter Covers Both PFAS and Microplastics