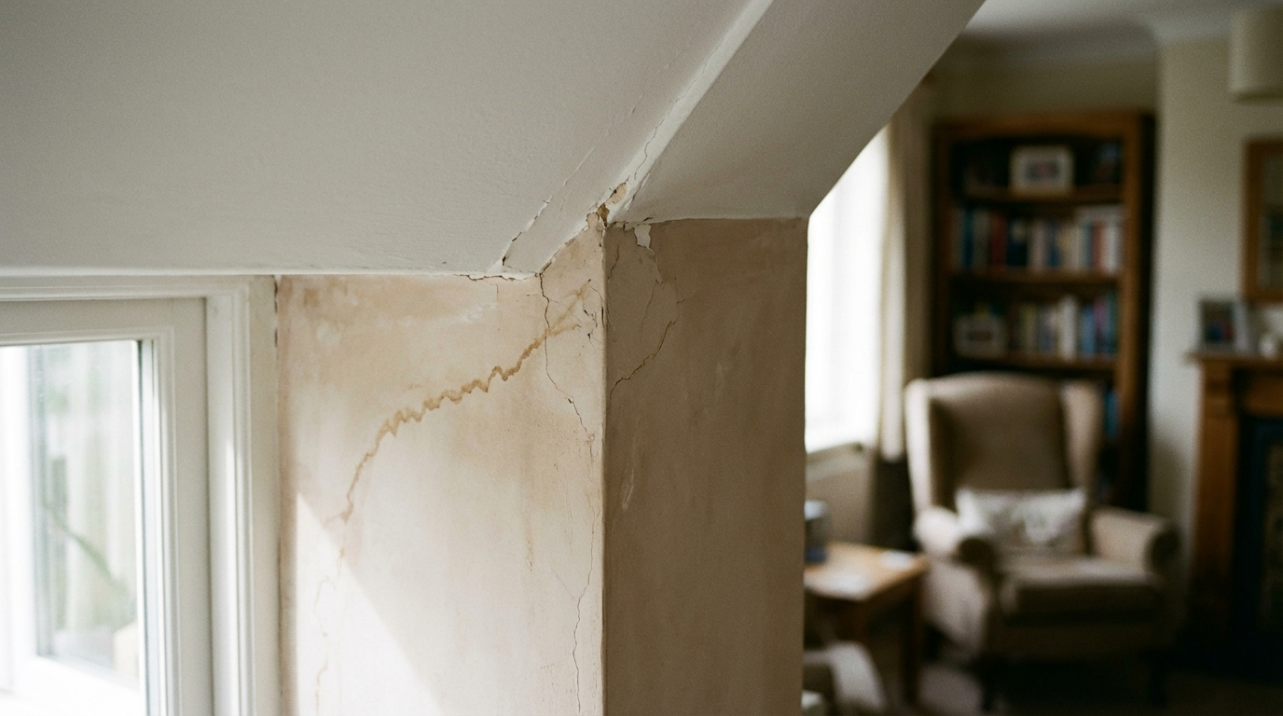
You notice a faint brown line where the ceiling meets the wall, or a shadow around a pipe or tile joint. It is easy to shrug and think, “It is just a stain.” As someone who spends a lot of time in mechanical rooms, under sinks, and near smart hydration equipment, I can tell you that thin joint stains are some of the most important early clues your home gives you.
Sometimes these stains come from a true leak: water escaping from a roof, pipe, or appliance and moving through hidden cavities. Other times, they are the result of condensation: warm, humid indoor air meeting a colder surface at a joint, so moisture appears without any broken pipe at all. The fixes, costs, and health implications are very different, so learning to tell the difference is worth your time.
This guide walks you through how restoration professionals read stains, how to apply the same logic at home, and how to protect both your building and your family’s water wellness.
Why Joint Stains Matter For Your Home And Health
Water damage is not just about ugly marks on paint. Restoration and inspection companies consistently warn that persistent moisture can lead to structural deterioration, mold growth, and safety issues. Professional assessors such as those at 24Restore and Elite Inspections emphasize that even small moisture problems, if left alone, can spread into framing, drywall, flooring, and foundations.
Property-restoration specialists like BELFOR note that water damage accounts for nearly one-third of property damage claims in the United States, and that moisture-related problems contribute to roughly half of indoor air quality issues. That means many “mystery symptoms” in homes—musty smells, recurring allergies, off odors in certain rooms—are actually moisture stories, not just air freshener problems.
Joint stains are especially important because they sit where materials meet and where building systems intersect. Common examples include the line where a ceiling meets an exterior wall, the seams where tile walls meet tub edges, the collar where a pipe comes through drywall, or the joint between sheet metal ducts. These are natural stress points for both leaks and condensation. They often hide plumbing, wiring, and structural elements, so any moisture there has more places to travel and more critical components to damage.
From a water-wellness viewpoint, the same moisture that weakens building materials also feeds mold and bacteria. That affects the air you breathe and, in some cases, the safety of the water that passes through nearby pipes. It is no accident that the same rooms we care about for hydration—kitchens, bathrooms, laundry rooms—are also the rooms most prone to water stains.
Imagine a simple example. A family notices a tea-colored line along the ceiling joint outside an upstairs bathroom. They paint over it. Six months later, they start smelling a musty odor and see a bulge near the same joint. A light investigation reveals a slow leak at a shower valve. Over that time, the leak has soaked insulation, fed mold, and softened framing. What started as a cosmetic annoyance has become a health issue and a structural repair.

Leak Or Condensation: What Is Actually Happening At That Joint?
At a high level, there are two primary ways water shows up at joints.
A leak is liquid water escaping from where it belongs and moving into structures. Roof leaks guided by gravity, pinhole plumbing leaks behind walls, or overflowing tubs and appliances can all send water along framing until it escapes at the weakest finish—often a joint. Articles from Cronin Engineering, Tadlock Roofing, and multiple plumbing and inspection companies describe this kind of water damage as one of the most frequent and expensive problems homeowners face, especially when leaks go unnoticed.
Condensation is different. It is moisture from the air that collects on a colder surface. When warm, humid indoor air touches a cooler joint—say, a metal duct joint passing through a hot attic or a cold-water line in a steamy bathroom—the air can no longer hold as much water, so it sheds moisture. That moisture can bead, drip, or soak nearby materials and eventually leave a stain, even though no pipe or roof is technically “broken.”
In practical terms, leaks bring in water from a specific source, often in larger volumes. Condensation is the air in your home squeezing water out of itself in many small episodes. Both can end up in exactly the same place, which is why homeowners feel unsure when they see a joint stain.
You can think of it the way water professionals categorize sources. Assessment frameworks described by magicplan and Homestar Group talk about Category 1 (clean supply water), Category 2 (slightly contaminated “gray” water from washing machines or dishwater), and Category 3 (heavily contaminated “black” water, often sewage). A condensation stain at a duct joint is usually more of a humidity and mold problem, while a stain from a plumbing joint above a ceiling might be clean supply water at first but can quickly take on contaminants as it moves through dust, insulation, and finishes.
To keep the distinctions clear, it helps to visualize them side by side.
Aspect |
Likely Leak |
Likely Condensation |
Source of moisture |
Water escaping from pipes, roof, appliances, or exterior runoff |
Indoor humid air contacting a cooler joint or surface |
Trigger events |
Rainstorms, appliance cycles, toilet flushes, long showers |
Steamy showers, cooking, seasonal humidity, temperature swings |
Typical joint locations |
Below bathrooms, under roof penetrations, around plumbing fittings |
On cold-water pipes, metal duct joints, window heads, exterior corners |
Stain pattern |
Rings, tracks, or expanding blotches that may follow gravity |
Diffuse hazy zones or repeated small spots on cold metal/pipe lines |
Primary risks |
Structural damage, hidden mold, electrical hazards, contaminated water categories |
Chronic mold, high humidity, gradual material decay |
Both scenarios matter for your health.

Chronic condensation can support mold just as effectively as a small leak, and the same musty, allergy-triggering air quality can result. The difference is that leaks are more likely to undermine structural stability and, when water is contaminated, introduce direct health hazards if touched or inhaled in droplets.
How To Read The Stain: Practical At-Home Assessment
Professionals begin with their senses before they ever reach for a tool. Guides from Cronin Engineering, BELFOR, and Dr Rooter emphasize that visual cues, touch, smell, and sound already tell you a lot about hidden moisture. You can apply the same approach to joint stains.
Study The Color, Shape, And Edges
Look at the color and pattern of the stain at the joint. Water damage guides commonly describe early stains as yellow, tan, or brown areas on ceilings and walls. A leak-driven stain often starts as a more defined spot, then gradually develops darker centers and lighter outer rings as repeated wetting and drying cycles occur. SERVPRO compares these rings to tree rings; multiple rings in varying shades suggest repeated episodes rather than a one-time event.
Condensation stains tend to be softer and more diffuse. Along a metal duct joint, for example, you might see a faint grayish halo or a series of similar spots along each cold seam. Along a window head where humid indoor air meets a cold frame, the staining may be very narrow and consistent along the joint rather than forming a round blotch.
Ceiling stains that appear directly below plumbing joints or roof valleys, especially if they show rings that keep growing after storms, lean toward leaks. Narrow lines along cold bridges in winter or after long, steamy showers lean more toward condensation.
Press, Tap, And Feel The Materials
Next, gently touch and tap the stained area. Restoration teams often use a simple touch test alongside their instruments. According to SERVPRO’s guidance on judging new versus old damage, an area that feels wet but still firm is usually newer, while an area that feels soft, spongy, or crumbly suggests long-standing moisture and material breakdown.
If a joint stain from a leak has been active for some time, you may feel that the drywall at the joint flexes more than the surrounding surface, or that baseboards near a floor joint have started to warp. BELFOR notes that warped, bulging, or sagging surfaces and a hollow sound when tapping can indicate more advanced internal deterioration.
Condensation stains usually occur in many small episodes. If you catch them early, the surface may feel dry or only slightly cool even though a stain is visible. Over time, repeated condensation can still soften materials, especially at gypsum joints, so do not assume firmness rules out a history of condensation; it simply suggests the moisture has not yet caused structural breakdown.
Watch The Timing And Pattern Over A Few Days
The timing of when the stain appears or worsens is one of the best clues you have. Liberty Mutual’s guidance on assessing flood damage, as well as SERVPRO’s recommendations, encourage homeowners to connect visible changes to weather and water-use history.
You can do the same with joint stains. If the mark grows after each heavy rain or snowmelt, that points toward a roof or exterior leak. If it expands after long showers or laundry days but not during dry spells, a plumbing or ventilation issue is more likely. If the stain appears and darkens in winter when the interior is warm and the outside is cold, especially around window, duct, or pipe joints, condensation is a strong candidate.
Cronin Engineering advises watching for stains that expand, change color, or spread along walls and ceilings. Any stain that is actively growing deserves prompt attention, regardless of cause. As a simple real-world exercise, you can take a quick photo of the stain with your cell phone every day at about the same time for a week. Comparing those photos side by side helps you see subtle growth that is hard to spot with memory alone.

Use Your Nose And Your Breathing As Sensors
Musty or earthy odors are classic signs of mold and prolonged dampness. BELFOR and Dr Rooter both highlight that even when you cannot see mold, a persistent musty smell near a joint is a warning that moisture has been around long enough to support biological growth.
From a water wellness perspective, this matters because mold and mildew from damp walls, ceilings, and joints can trigger respiratory issues and allergies. Elite Inspections notes that mold can begin growing within roughly twenty-four to forty-eight hours in water-damaged materials. That means a leak or condensation issue you notice this week may already be affecting the air your family breathes by the time you smell it.
Odors alone do not distinguish leaks from condensation. However, if the smell intensifies after showers or in very humid weather and the stain sits near cold-metal joints or uninsulated pipes, condensation may be a larger piece of the puzzle. If the smell spikes after storms, near plumbing supply joints, or in a specific ceiling area regardless of season, a leak becomes more likely.
Check Humidity And Compare With Nearby Areas
Professional assessors routinely measure humidity and moisture in the air and in materials. Magicplan’s assessment guide and the water-damage tools overview both mention digital hygrometers and thermo-hygrometers as standard gear. These devices measure indoor relative humidity and, in some models, temperature.
For a homeowner, even a basic room hygrometer can help you differentiate patterns. If the room with a joint stain regularly runs much more humid than the rest of the home, especially after showers or cooking, persistent condensation becomes more believable. If overall humidity is moderate yet the stain continues to grow, that suggests a hidden leak feeding moisture independent of room conditions.
In the same spirit, pinless moisture meters like the drywall meters discussed by Tramex can reveal hidden moisture behind joints without opening walls. Dual-depth models scan shallow and deeper layers, helping professionals see whether moisture is only on the surface (more common with recent condensation) or deep within wall assemblies (more typical of leaks). In practice, even a simpler consumer-grade meter can show you whether the joint area is significantly wetter than nearby “normal” spots.
Tools Pros Use (And How You Can Borrow Their Playbook)
When professionals walk into a property with suspicious joint stains, they blend informed observation with measurement. Articles from 24Restore, Homestar Group, magicplan, Elite Inspections, and BELFOR describe a common toolkit.
Here is how those tools relate specifically to stains at joints.
Tool / Method |
What It Shows At Joints |
How It Helps You Decide |
Bright flashlight |
Discoloration, hairline cracks, slight bulging, corrosion on fittings |
Clarifies whether the stain is localized, spreading, or cracking |
Digital hygrometer |
Room humidity levels |
Points toward condensation risk in specific spaces |
Thermal imaging camera |
Cooler or warmer zones behind surfaces |
Highlights hidden wet areas behind joints, guiding further checks |
Pinless moisture meter |
Moisture inside drywall, plaster, and wood without puncturing |
Distinguishes dry cosmetic stains from active moisture at joints |
Pin-type moisture probe |
Detailed readings at specific spots or depths |
Confirms suspicious areas before opening walls or ceilings |
Acoustic listening devices |
Sound of water moving through pipes or cavities |
Helps locate leaks behind joints when no surface water is visible |
Digital floor-plan and reporting apps |
Organized maps, photos, and moisture readings |
Keeps a clear record of what is happening and where over time |
Thermal imaging and moisture meters work especially well together. Magicplan’s and Elite Inspections’ materials note that thermal cameras show temperature differences that may signal moisture, but only moisture meters confirm whether water is actually present. In a ceiling joint with a stain, a cooler stripe on a thermal image that aligns with a plumbing run, plus high moisture readings, is a strong leak clue. The same cooler stripe without high moisture readings might simply be a cold joint prone to condensation.
Even if you do not own these tools, understanding how they are used helps you interpret what contractors tell you and decide whether a second opinion is warranted. If a stain at a joint worries you, many restoration and inspection companies offer assessments that include these measurements, along with written reports you can keep for insurance and maintenance planning.
When Condensation Is The Culprit At Joints
Not every joint stain means a broken pipe. High humidity and temperature differences can create surprising moisture patterns.
Common condensation hotspots include metal duct joints in attics, cold-water pipe penetrations in steamy bathrooms, and window and door heads where warm indoor air meets cold exterior framing. Articles on water intrusion and hidden leaks, such as those from RHAWA and Smith’s Plumbing, describe how dampness in these areas often stems from poor ventilation, inadequate insulation, or cold bridging rather than outright leaks.
Picture a basement with exposed metal ductwork. In summer, that duct carries cool air while the surrounding basement air is warmer and humid. Moisture condenses on the coldest parts of the duct, often at seams and joints. Drops fall to the floor or onto nearby framing, and over time you see rust at the joint and faint staining where water has dripped. No pipe is broken, yet there is real moisture and a real risk of mold and corrosion.
Similarly, a cold-water line running behind a bathroom wall can “sweat” during long hot showers if the wall cavity is not ventilated or insulated well. Moisture condenses on the pipe surface and the coldest parts of nearby joints. If that happens most days, the joint area may stay damp enough to stain and eventually support mold.
From a health standpoint, chronic condensation at joints still matters. BELFOR and several plumbing and restoration sources emphasize that high indoor humidity and trapped moisture are major contributors to indoor air quality problems. Even though the water itself is not contaminated in the same way as sewage, the damp environment encourages mold and dust mites, both of which aggravate asthma and allergies.
Addressing condensation-driven joint stains usually has three pillars. The first is reducing indoor humidity in problem rooms with exhaust fans, dehumidifiers, and sensible ventilation. The second is insulating cold surfaces—like duct joints and cold-water pipes—to reduce the temperature contrast that causes condensation. The third is closing unnecessary air leaks around joints so humid air does not constantly reach those cold spots.
This is also where your hydration mindset can pay off. The same awareness you apply to tracking your daily water intake can be applied to tracking moisture in your home. If you notice that the bathroom where everyone showers in the morning always feels the heaviest and that stains cluster around duct or pipe joints there, treat ventilation as part of your family’s wellness routine, not just a comfort tweak.
When A True Leak Is Hiding Behind The Joint
Leak-driven joint stains represent a different level of concern. Home-inspection resources from Cronin Engineering, Elite Inspections, Tadlock Roofing, Dr Rooter, and Liberty Mutual all emphasize that early leak detection can prevent rot, electrical hazards, and expensive structural repairs.
A leak at or near a joint can come from many sources. In ceilings, it may be a roof leak traveling along rafters until it exits at a ceiling-wall joint. In interior walls, it might be a pinhole leak at a plumbing elbow or a failed fitting where a pipe passes through a stud space. Around tile joints in showers, deteriorated grout can allow water to seep behind walls. Around windows and doors, failed flashing or sealant can let rainwater into joint areas.
Water moving through these paths can stay hidden for quite some time. Homestar Group explains that thorough water-damage assessment usually involves an initial inspection, a detailed visual review, and then, when needed, opening up wet areas to examine framing, insulation, and wiring. JustAnswer’s expert discussion of interior wall remediation notes that professionals often remove only the portions of drywall that have actually become wet in order to inspect and dry the framing, then replace the finishes once they are sound.
Several practical signs tilt a joint stain toward leak rather than condensation. Stains that keep spreading, rings that darken and multiply, surfaces that sag or feel soft, and musty odors that grow stronger over time all support the idea of ongoing water intrusion. If the stain shows up directly beneath bathrooms, kitchens, or roof features such as chimneys and skylights, that alignment matters as well.
You can cross-check your observations with simple system-level tests described by Dr Rooter and Johnson Comfort. One example is a water meter test. You shut off all fixtures and appliances that use water, then watch your meter. If the dials keep moving, or if readings increase over a couple of quiet hours, hidden leaks are likely. When that test suggests a leak and you also see an expanding joint stain along a ceiling or wall, the combined evidence is strong enough to warrant professional help.
Time is important here. Elite Inspections notes that mold can begin to grow within about one to two days in wet building materials. Several restoration companies, including SERVPRO and 24Restore, stress that early intervention is far less costly than delayed structural repairs. Even if a stain looks old, SERVPRO warns that water damage should not be ignored; apparent age does not guarantee that the source has stopped.
Contamination level matters too. Magicplan’s assessment guidance differentiates clean supply water from slightly contaminated gray water and heavily contaminated black water. A joint stain from a supply-line elbow in a wall might begin as Category 1 water, but once that water has passed through insulation, wood, and dust, it should be treated more cautiously. A stain near a bathroom joint or floor drain may involve water that is already gray or black from the outset, which raises the bar for safety when handling and cleaning the area.
From a water-wellness lens, remember that you want the water in your glass to be ultra clean and the water in your walls to be nearly zero. A good filtration or softening system protects what you drink. Leak detection, prompt assessment, and professional remediation protect what you breathe and the structure you live in.
Documentation, Insurance, And When To Call For Backup
Once you suspect that a joint stain comes from a leak or from persistent condensation that is damaging materials, the next step is to document and, if needed, escalate.
Magicplan’s documentation guides recommend capturing administrative details, mapping affected areas, and collecting digital evidence. Even for a single stain, it helps to note the date you first observed it, take clear photos from several angles, and, if you or a professional use moisture meters, record those readings. Homestar Group and Liberty Mutual both highlight that thorough documentation supports accurate remediation planning and smoother insurance conversations after larger events.
As stains multiply or spread, apps that combine floor plans with photos can give you a visual history of where moisture has appeared in your home. That kind of record is extremely helpful when a roofer, plumber, or restoration company needs to understand the timeline or when an adjuster is evaluating a claim.
Deciding when to call for professional support is partly about scale and partly about risk. Articles from PureDry Restoration, SERVPRO, Liberty Mutual, Elite Inspections, and others suggest several clear red flags. Sagging ceilings at joints, any sign of water near electrical fixtures or wiring, visible mold colonies, stains associated with sewage or floodwater, and recurring or expanding joint stains after you thought a problem was fixed all fall into the category where professional assessment is strongly recommended.
For smaller, clearly condensation-driven stains at joints, you may choose an initial DIY route: improving ventilation, adding insulation to cold pipes or duct joints, and watching for improvement while keeping an eye (and nose) out for mold. For suspected leaks behind joints, especially in multi-story areas where water might be traveling far from its source, involving a plumber, roofer, or restoration specialist early usually saves money and stress in the long run.
Smart Hydration Mindset: Preventing The Next Joint Stain
Hidden leaks and chronic condensation do more than damage drywall. Smith’s Plumbing, drawing on Environmental Protection Agency estimates, notes that typical household leaks can waste nearly ten thousand gallons of water per year. That is water you pay for, water your city treats and pumps, and water that never reaches your glass.
A smart hydration mindset treats water as a precious, health-critical resource. It is not enough to install a high-quality under-sink filter or whole-home system and call it a day. You also want to know where water is escaping and how moisture behaves in your home.
This is where modern leak-detection tools and simple habits work together. Placing smart leak sensors near vulnerable joints—under sinks where supply lines meet valves, at the base of fridge and dishwasher connections, near joints in finished basements—can alert you quickly when a small leak begins. Pairing that with periodic visual checks of ceiling and wall joints in high-risk rooms, and with occasional water meter tests during quiet periods, gives you a clearer picture of your home’s water story.
On the condensation side, integrating humidity awareness into daily routines makes a real difference. If a bathroom consistently fogs up and the ceiling joint above the shower stays stained despite ventilation, that is not just a cosmetic issue; it is a sign that your air and building envelope are not in balance. Treating fans, dehumidifiers, and joint insulation as part of your hydration system—not as afterthoughts—aligns your building’s health with your family’s wellness.
Over time, these habits reduce the number of surprises your walls and ceilings present. They also support the longevity of any smart filtration or softening equipment you install, since dry, well-ventilated mechanical spaces are kinder to valves, sensors, and housings.
Quick FAQ: Common Joint-Stain Questions
Is a faint hairline stain at a ceiling joint always a leak?
Not always. A thin, faint line at a joint can come from a one-time condensation event or from a small historical leak that has dried. However, resources from Cronin Engineering and BELFOR stress that you should monitor any stain for change. If it grows, darkens, or is accompanied by musty odors or soft spots, treat it as active moisture until proven otherwise.
Can I just paint over a joint stain?
Painting without addressing the moisture source almost always leads to disappointment. PureDry Restoration notes that stains often “telegraph” back through new paint if the underlying water problem is not corrected. Professional guidance from Homestar Group and JustAnswer’s remediation expert both emphasize that the sequence should be diagnose, dry, repair, and only then repaint. In many cases, that includes checking whether insulation and framing behind the joint have been affected.
Do smart water monitors help distinguish leaks from condensation?
Smart monitors and leak sensors are best at detecting active water where it should not be, such as puddles under joints or unexpected flow through supply lines when fixtures are off. That makes them well suited to catching leaks. Condensation, especially small amounts at elevated joints, may not drip enough to trigger a sensor. For condensation-driven stains, humidity monitors, visual checks, and ventilation improvements are more effective. Ideally, you use both: smart leak detection for sudden or hidden leaks and moisture-awareness habits for chronic condensation.
A thin stain at a joint is your home whispering that its water story needs attention. Whether the culprit is a sneaky leak or everyday condensation, responding thoughtfully protects the structure around you, the air you breathe, and the water you drink. Approached with the same care you give to your personal hydration, joint stain detective work becomes less of a chore and more of an essential part of a healthy, resilient home.
References
- https://www.epa.gov/sites/default/files/2014-08/documents/moisture-control.pdf
- https://www.rhawa.org/blog/a-little-bit-of-info-how-to-identify-water-intrusion
- https://www.homestargroup.net/restoration-tips/what-is-water-damage-assessment
- https://www.johnsoncomfort.com/7-ways-to-find-hidden-water-leaks-in-your-home
- https://blog.magicplan.app/how-to-document-water-damage
- https://tramexmeters.com/moisture-meter-for-drywall
- https://24restore.com/how-professionals-determine-the-extent-of-water-damage-in-a-property/
- https://selectbuildinginspections.com.au/8-structural-damage-warning-signs-you-should-never-ignore/
- https://cronin.engineer/how-to-spot-water-damage-in-buildings/
- https://www.drrooterlexington.com/blog-posts/how-to-detect-water-leaks-in-walls

Share:
Emergency Repair Techniques for Broken Filter Clips in Appliances
How to Determine if an Electromagnetic Valve Is Stuck in Your Water System