When someone tells me their reverse osmosis drinking water system is “barely trickling,” I almost always reach for one tool first: a pressure gauge. As a Smart Hydration Specialist and Water Wellness Advocate, I see the same pattern in kitchens, labs, and even reef-aquarium setups. The system itself is often fine. The real culprit is water pressure that never reaches what the membrane needs to do its job.
Minimum pressure is not just an engineering detail. It determines whether your RO system can actually protect your family’s hydration, how long your filters last, how much water you waste, and how satisfying that glass of water feels when you turn on the faucet. In this article, we will unpack what “minimum pressure” really means, how different systems define it, and what you can do at home to hit the sweet spot safely and reliably.
What “Minimum Pressure” Really Means in an RO System
Reverse osmosis is built on a simple but powerful idea. In natural osmosis, water moves through a semipermeable membrane from a weaker solution toward a stronger one until the pressure difference balances out. Educational resources from brands like Luminor and Puretec explain that osmotic pressure is the amount of pressure you would need to apply to stop that flow.
Reverse osmosis flips the script by applying pressure on the “salty” or contaminated side, forcing water molecules through the membrane while most dissolved salts, metals, and organics stay behind. For any RO system to work, the applied pressure has to exceed the opposing osmotic pressure enough to create a usable net driving force.
In plain language, the membrane wants a certain push. Below that threshold, production slows to a dribble or stops. That threshold is what manufacturers are talking about when they specify a minimum inlet pressure.

There are really three different “minimums” to keep straight:
First, the minimum inlet pressure at the RO system feed connection. This is what your home plumbing delivers to the unit before it does anything.
Second, the effective pressure at the membrane itself, after losses across sediment and carbon filters. This is what actually drives water through the membrane.
Third, the precharge air pressure in the RO storage tank, which determines how strongly water is pushed out of the faucet once it has already been purified and stored.
When homeowners say, “My RO pressure is low,” they may be talking about any of these. Understanding how they relate is the key to fixing problems without guesswork.
The Science: Pressure, Osmosis, and Net Driving Force
Technical guidance from Puretec and eWaterMart describes RO performance in terms of a “net driving force,” which is roughly the feed pressure minus the osmotic pressure of the water. When that net driving force is high, more water passes through the membrane; when it is low, production falls off.
Data from eWaterMart illustrates this clearly for a large 8‑inch RO element. Under standard test conditions (moderate salinity at about 77°F and a fixed recovery), raising feed pressure from about 150 psi to around 225 psi can increase theoretical water production by roughly 40 to 50 percent, while dropping pressure to around 100 psi can cut production by more than 30 percent. The exact numbers apply to industrial elements, but the relationship holds for home systems: as pressure goes up within the safe range, water production goes up; as pressure drops toward the minimum, production falls and may become impractically slow.
For high-salinity feeds like seawater, the required pressures are much higher. eWaterMart notes that seawater, because of its high osmotic pressure, can need feed pressures on the order of several hundred to over one thousand psi, while brackish water may need roughly a few dozen to a couple hundred psi. By comparison, typical tap water feeding a home drinking-water RO system has much lower salinity, so manufacturers can design membranes to work in the 40 to 80 psi range that a normal plumbing system can provide.
Regardless of scale, the physics is the same. There is always a minimum pressure where the net driving force becomes usable. Below that, the system is powered but not performing.

Typical Minimum Pressure Ranges by System Type
Different RO systems are engineered for different environments, so their minimum pressure requirements are not identical. The common thread is that they all become unreliable if inlet pressure chronically sits below their specified minimum.
Manufacturers and service providers give fairly consistent ranges for household drinking-water RO units. Nelson Water explains that most residential RO systems require at least about 40 psi to work efficiently, and they recommend keeping home water pressure in the roughly 40 to 60 psi range. Watts Water Technologies, in its reverse osmosis FAQ, notes that ideal operating pressure for a typical home RO is about 60 psi and explicitly warns that pressures below around 40 psi are usually insufficient without a booster pump. NU Aqua Systems, writing about water pressure and RO performance, describes a general ideal range of about 45 to 80 psi for residential and light commercial plumbing.
Lab systems, low-pressure specialty units, and booster-pump-equipped systems broaden that picture. HHitech’s guidance for laboratory RO systems notes that many lab units specify minimum inlet pressures in the 20 to 40 psi range, some compact models can operate with minimum pressures around 15 psi, and high-demand systems may require 40 psi or more. NU Aqua highlights a specific RO drinking system with a built-in booster pump that is designed to work with feed pressures as low as about 15 psi and up to roughly 45 psi, because the pump raises the internal pressure at the membrane to where it needs to be.
Storage tanks layer on their own pressure requirements. WaterFilterGuru notes that a typical 2 to 4 gallon RO tank performs best when the air precharge, measured with the tank empty, is about 6 to 8 psi. Osmotech’s tank guidelines give a similar recommendation expressed in metric terms, which converts to roughly 7 to 12 psi when empty, and they pair that with feed-water pressures in the neighborhood of 3 to 6 bar, which is about 44 to 87 psi, for most residential RO membranes.
For context, here is a concise comparison of typical ranges drawn from these sources.
System type |
Typical minimum inlet pressure (approximate) |
Ideal working range at inlet (approximate) |
Example sources |
Standard under-sink RO (no booster pump) |
Around 40 psi |
About 45–80 psi, often rated at ~60 psi |
Nelson Water, Watts, NU Aqua, Water Quality Association |
Lab RO systems |
About 20–40 psi, some near 15 psi |
Model-specific; higher for high-demand use |
HHitech |
RO system with integrated booster pump |
Feed as low as about 15 psi |
Pump raises membrane pressure internally |
NU Aqua Systems |
RO storage tank air precharge (empty tank) |
Roughly 6–12 psi |
Often targeted near 7–8 psi |
WaterFilterGuru, Osmotech |
Residential RO membrane feed with good output |
Around mid‑40s psi and above |
About 44–87 psi for many designs |
Osmotech, Watts |
The takeaway for a homeowner is straightforward.

A typical, non-boosted kitchen RO system wants to see at least about 40 psi at its inlet, and it will do its best work when your plumbing delivers something closer to the 45 to 80 psi band.
How Low Pressure Shows Up at the Faucet
From a hydration perspective, pressure problems first show up in very practical ways. Nelson Water describes slow flow at the RO faucet as a primary symptom of system trouble, and low inlet pressure is one of the most common causes they highlight alongside clogged filters and fouled membranes.
When inlet pressure falls below the manufacturer’s minimum, several things happen at once. The most obvious is low or intermittent flow at the faucet. Because the RO membrane is producing water more slowly, the storage tank takes much longer to fill and may never reach the pressure needed for the automatic shutoff valve to stop production. Osmotech notes that the shutoff valve is designed to close when tank pressure reaches about two-thirds of the incoming feed pressure. If the feed pressure is low, the tank never builds enough back pressure, the system may run for long periods, and yet you still get weak flow when you open the faucet.
Low pressure also changes how the storage tank behaves. WaterFilterGuru explains that with a healthy precharge of about 6 to 8 psi, a small residential tank might deliver around 30 psi when full, assuming normal inlet pressure. If household pressure is already marginal, the effective pressure at the tap can drop to an anemic trickle, even if the tank is technically full of water.
Water quality also suffers. NU Aqua points out that inadequate pressure reduces contaminant removal efficiency and increases the waste-to-product water ratio, meaning you send more water down the drain for every gallon of purified water you drink. The Water Quality Association’s guidance on point-of-use RO sizing notes that systems are typically rated at standardized conditions around 60 psi and 77°F. In real homes with lower pressure and colder water, they observe that actual production can drop by roughly 30 to 60 percent below the nameplate gallons-per-day rating. That is not just an engineering curiosity; it is the difference between a system that keeps up with your family’s hydration habits and one that constantly runs behind.
Long term, running below minimum pressure shortens component life. NU Aqua and HHitech both emphasize that low pressure encourages uneven flow across the membrane surface, allowing more contaminants to accumulate on certain sections and accelerating fouling. That means more frequent filter changes, earlier membrane replacements, and higher lifetime cost per gallon of drinking water.
How Temperature Changes the Pressure You Really Need
Pressure is not the only variable that determines performance. Feed-water temperature plays a surprisingly big role in how much pressure you effectively need.
H2O Distributors provides a pressure–temperature chart for RO membranes that is referenced to a standard condition of 65 psi and 77°F. At that baseline, the performance factor is set to 1.00. At a chilly 45°F and a low 35 psi, the factor drops to about 0.23, which means the membrane may only produce roughly 23 percent of its rated output. Even at 50°F and a respectable 65 psi, the factor is around 0.52, or about half of the baseline production. At the warmer end, 90°F and 65 psi produce a factor of about 1.23, and the combination of 95°F and 110 psi reaches more than double the baseline output.
Water-conditioning experts in Maryland have also highlighted the way seasonal temperature swings interact with pressure. They note that colder water can make the filtration process more efficient from a contaminant-removal standpoint, but its higher viscosity can effectively reduce flow and pressure through the membrane. eWaterMart’s technical discussion echoes this by observing that permeate flow generally rises by a few percent for each degree Fahrenheit increase in water temperature, which allows operators to reduce pressure in warmer conditions but forces them to increase pressure in colder conditions if they want to maintain the same production rate.
The Water Quality Association summarizes the homeowner implication clearly. Because real-world pressure and temperature are often lower than test conditions, you should not be surprised if your RO system produces significantly less water in winter or in low-pressure homes than its rated GPD number suggests. In other words, meeting the nominal minimum pressure on paper is not always enough; you need to consider your coldest-water, lowest-pressure days when deciding whether your setup truly meets the system’s requirements.
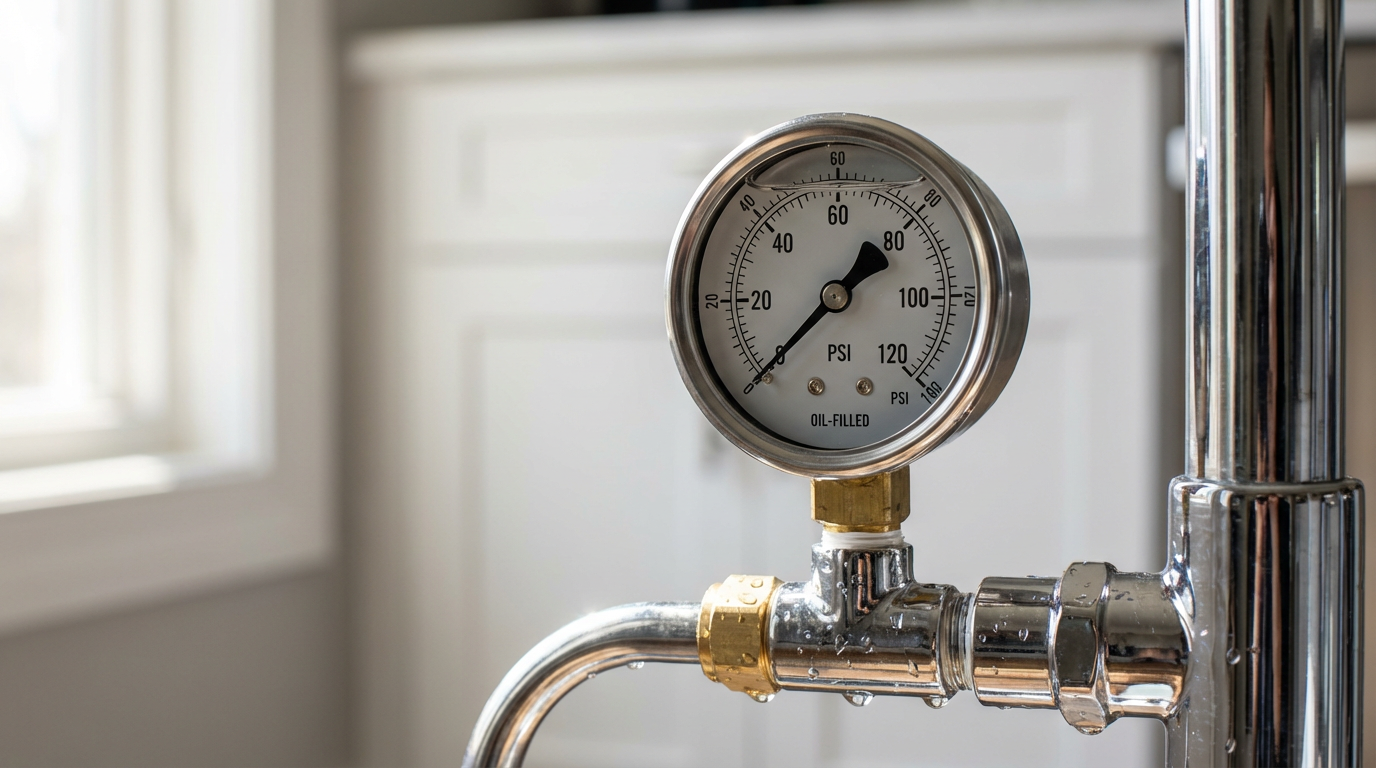
Measuring Your RO System’s Pressure the Right Way
You cannot manage what you do not measure, and that is especially true for RO pressure. Fortunately, checking it is straightforward once you know where to look.
NU Aqua recommends starting with overall supply pressure. A simple pressure gauge can be screwed onto an outdoor hose bib or a threaded laundry tap to measure your household pressure at rest and while water is flowing elsewhere. This gives you a baseline for how much pressure the RO system can possibly see.
To understand what the membrane itself is experiencing, you need a gauge on the RO plumbing. Bulk Reef Supply, which provides technical guidance for RO users, strongly recommends installing an RO pressure gauge after the carbon block filters and before the membrane. They point out that this location tells you both the working pressure feeding the membrane and the pressure drop across your prefilters. If the gauge once read 60 psi at that point and now reads 45 psi under the same conditions, that is a strong sign that sediment or carbon filters are clogging.
The installation itself is simple. Bulk Reef Supply outlines a process that begins by shutting off the water feeding the RO unit and opening the RO faucet to relieve pressure. Once the system is depressurized, you choose a spot in the quarter-inch RO tubing just before the membrane housing, cut the tubing cleanly with a tubing cutter, insert a tee fitting, and mount the pressure gauge into that tee. They note that the direction of water flow through the gauge does not affect readings. When you slowly turn the water back on, you watch for leaks around the new connections and then observe the pressure while the system is producing water.
Tank pressure is measured differently. WaterFilterGuru explains that to check the air precharge, you first shut off the water supply to the RO system, open the RO faucet, and wait until the tank is completely drained and water has stopped flowing. Then you remove the cap from the Schrader valve on the tank (it looks like a tire valve) and use a low-range pressure gauge to measure the air pressure. If it reads below the recommended 6 to 8 psi range, you use a hand or bicycle pump to add small bursts of air, checking with the gauge until you reach the correct precharge.
Between an inlet gauge and a tank precharge check, you can diagnose most pressure-related hydration issues without a service call.

Practical Ways to Meet Minimum Pressure
If your gauges tell you that your home pressure is lower than your RO system wants, there are several practical paths to bringing it into an acceptable range.
When whole-house pressure is modest but not extremely low, basic plumbing fixes may help. NU Aqua and HHitech both point out that aging or corroded piping, partially closed valves, and hidden leaks can all reduce pressure at the point of use. Repairing leaks, replacing severely corroded sections, and ensuring valves feeding the RO are fully open can restore several psi without adding equipment.
When supply pressure is consistently below the 40 psi threshold that Nelson Water and Watts describe as the lower bound for efficient residential RO operation, a booster pump is usually the most reliable solution. NU Aqua highlights booster pumps specifically for homes with persistently low pressure, and HHitech recommends them for labs when building pressure is low. These pumps are installed on the feed line to the RO unit and automatically raise pressure to the membrane’s ideal range whenever the system is producing water. NU Aqua’s example of a seven-stage RO system with a built-in booster pump designed for feed pressures between about 15 and 45 psi illustrates how effective this can be: even though the building supply is weak, the run-time pressure at the membrane is brought up to the proper level internally.
On the high-pressure side, both NU Aqua and Osmotech caution that excessively high inlet pressure can stress housings, fittings, and membranes. Osmotech notes that most residential RO systems are designed to operate comfortably within a feed range of about 3 to 6 bar, which corresponds to roughly 44 to 87 psi. Above that, the risk of leaks and damage climbs, and a pressure regulator is recommended to bring the inlet back into the safe range. Watts also warns that while higher pressure improves production up to a point, going far beyond the system’s rating can cause mechanical issues.
Regardless of which hardware you add, professional guidance strongly favors regular monitoring over a one-time fix.

NU Aqua and the Water Quality Association both emphasize that periodic checks of inlet pressure, filter condition, and system performance help you catch pressure-related issues early and avoid surprises at the faucet.
The Often-Forgotten Pressure Requirement: Your RO Storage Tank
Even when inlet pressure is acceptable, the storage tank itself can create “low pressure” symptoms if its internal air charge is off.
An RO tank is divided into two chambers by a flexible bladder: water on one side and compressed air on the other. As the RO system fills the tank with purified water, it compresses the air. When you open the faucet, that compressed air pushes the water out. If there is not enough air pressure when the tank is empty, the tank can become waterlogged, filling with water but delivering only weak flow. If there is too much air, the bladder resists filling, and the tank may shut off with only a small amount of stored water.
Osmotech recommends precharging standard residential tanks to about 0.5 to 0.8 bar when empty, which is roughly 7 to 12 psi. They advise measuring and setting this with the tank completely empty and checking it about once a year. WaterFilterGuru gives a similar range and notes that for a typical small tank, a precharge of about 6 to 8 psi when empty is ideal, with a full tank often delivering around 30 psi as water is drawn.
Both sources describe the consequences of getting this wrong. With too little precharge, the tank fills nearly solid with water, but the air cushion is so weak that flow at the faucet is just a dribble and the system may never build enough back pressure for the automatic shutoff valve to close. With too much precharge, the tank reaches the shutoff pressure after storing only a small volume of water, which drastically reduces how much you can draw before pressure collapses.
There is also an important interaction with inlet pressure. Osmotech explains that the automatic shutoff valve is designed so that production stops when tank pressure reaches about two-thirds of the incoming feed pressure. If feed pressure is low, that shutoff happens at a lower tank pressure, which reduces the usable drawdown volume. If feed pressure is healthy but tank precharge is set too high, the tank may reach that two-thirds cutoff with very little water inside.
In practice, I see many “weak RO” complaints solved by simply draining the tank fully and setting the empty-tank air pressure back to the manufacturer’s recommended value. It is a small task that often restores both flow and storage capacity without replacing any parts.

Scenario Walkthroughs: How Minimum Pressure Plays Out at Home
To make all of this more tangible, it helps to look at how real pressure and temperature conditions can affect your hydration experience.
Imagine a home at the end of a municipal line where winter pressure at the kitchen tap is about 35 psi while the RO is running, and the incoming water in January is near 45°F. H2O Distributors’ pressure–temperature chart shows that at 45°F and 35 psi, an RO membrane may operate at roughly 23 percent of its rated output compared with the 65 psi and 77°F test condition. That means a system marketed as 50 gallons per day might effectively behave more like an 11 or 12 gallon per day system under those conditions. The homeowner will see a storage tank that takes most of the day to refill and flow that nosedives after a couple of glasses.
In a different home with about 60 psi of stable pressure and moderate water temperature, the same RO model would perform much closer to its rating. Watts notes that around 60 psi is the ideal operating pressure for many home RO units, and the Water Quality Association’s standard test conditions mirror that value. In this case, even if the family draws several quarts for cooking and hydration around dinner, the tank can recover between uses, and nobody gives pressure a second thought.
In a lab, the story is similar but the stakes are higher. HHitech warns that if inlet pressure drops below the specified minimum, a lab RO system may not be able to keep up with demand for cell culture or analytical work, and water purity can fall short of required specs. Installing a properly sized booster pump and continuously monitoring inlet pressure become part of protecting not just hydration but experimental reliability.
What these scenarios have in common is that respecting the system’s minimum pressure requirement is essential to getting the performance you paid for. Whether you are feeding a family, an espresso machine, or a cell culture incubator, pressure is the quiet driver underneath your water quality.

Short FAQ on RO Minimum Pressure
Can my RO system work if my house pressure is only 30 psi?
Based on guidance from Nelson Water, Watts, NU Aqua, and the Water Quality Association, 30 psi is typically below the minimum inlet pressure for standard under-sink RO systems. At that level, expect very slow production, poor storage tank recovery, and increased stress on the membrane. A booster pump or a system specifically designed for low inlet pressure is usually needed to get reliable performance.
Is higher pressure always better for RO water quality?
Up to the manufacturer’s recommended range, higher pressure generally improves production and can improve effective contaminant rejection by increasing water flux relative to salt passage, as technical discussions from eWaterMart and others point out. However, going beyond the system’s rated pressure can compact the membrane, increase fouling and scaling, and stress housings and fittings. Osmotech and NU Aqua both caution against feed pressures significantly above the designed range, and they recommend using a pressure regulator if your supply is too high.
How often should I check my RO pressure and tank precharge?
Most manufacturers and service providers that discuss maintenance, including Osmotech, WaterFilterGuru, NU Aqua, and the Water Quality Association, encourage routine checks rather than waiting for a problem. In practice, I recommend measuring inlet pressure and tank precharge at least once a year or any time you notice slower flow or changes in taste. Checking after major plumbing work or seasonal pressure changes is also wise.
As someone who spends a lot of time at the intersection of water science and everyday hydration, I see minimum pressure as one of the simplest levers you can control for healthier, more reliable drinking water at home. A small gauge, a quick reading, and, when needed, a modest pump or regulator can transform your RO system from “it sort of works” into a quiet, dependable hydration partner for your kitchen and your health.
References
- https://www.energy.gov/femp/articles/reverse-osmosis-optimization
- https://wamas.org/forums/topic/74966-rodi-pressure-gauge-and-tds-meter-placement/
- https://wqa.org/wp-content/uploads/2022/09/Article-4-POU-RO-Performance-and-Sizing.pdf
- https://www.ewatermart.com/the-influence-of-water-supply-pressure-on-the-performance-of-reverse-osmosis-system.html
- https://www.osmotech.co.za/reverse-osmosis-storage-tank-air-pressure-and-feed-water-pressure-guidelines/?srsltid=AfmBOoo0neylUSY_Sp5GeMiO3iPSwVSBN-kBeHQgteClgmpSb6PrVL1F
- https://www.ecosoft.com/post/how-to-increase-the-pressure-of-the-reverse-osmosis-tank
- https://espwaterproducts.com/pages/why-reverse-osmosis-water-flow-is-slow?srsltid=AfmBOopc9Hpz6Z0qwKUd8YDy5ES1iyVRyW0rUphXnIzOjHehne0Tihq_
- https://xray.greyb.com/reverse-osmosis/operating-at-optimal-pressures-and-flow-rates
- https://www.hhitechlabwater.com/blog/what-is-the-minimum-inlet-water-pressure-for-a-lab-ro-water-system-1048590.html
- https://www.home-barista.com/water/reverse-osmosis-water-system-efficiency-t71414.html

Share:
How Capacitive Touch Control in Smart Faucets Achieves Water Resistance
Understanding the Effectiveness of 253.7 nm Wavelength UV Lamps