If you use a reverse osmosis (RO) system for drinking water at home, you probably think first about filters and membranes. Yet one of the smallest parts in the system, the check valve, has an outsized impact on your water quality, system efficiency, and long‑term reliability. When I review under‑sink RO installations, a worn or missing check valve is one of the most common hidden problems I see behind issues like constant draining, poor flow, or strange behavior when the tank is full.
In this guide, I will walk you through what RO check valves do, where they sit in the system, how they protect your health and equipment, and how to recognize when they need attention. Everything here is grounded in manufacturer documentation and technical resources from companies such as Puretec Industrial Water, Tameson, Pure Water Products, Frizzlife, NU Aqua, and others, and translated into practical, homeowner‑friendly language.
A Quick Refresher on How RO Systems Work
Reverse osmosis is a pressure‑driven filtration process that forces water through a semi‑permeable membrane to remove dissolved salts, particles, organics, and many microorganisms. Technical resources from Puretec Industrial Water describe well‑designed RO systems as rejecting roughly 95 to 99 percent of many dissolved contaminants under normal operating conditions. Tameson and other engineering sources explain that the membrane divides the system into two sides: purified product water called permeate, and a concentrated reject stream often called brine or concentrate.
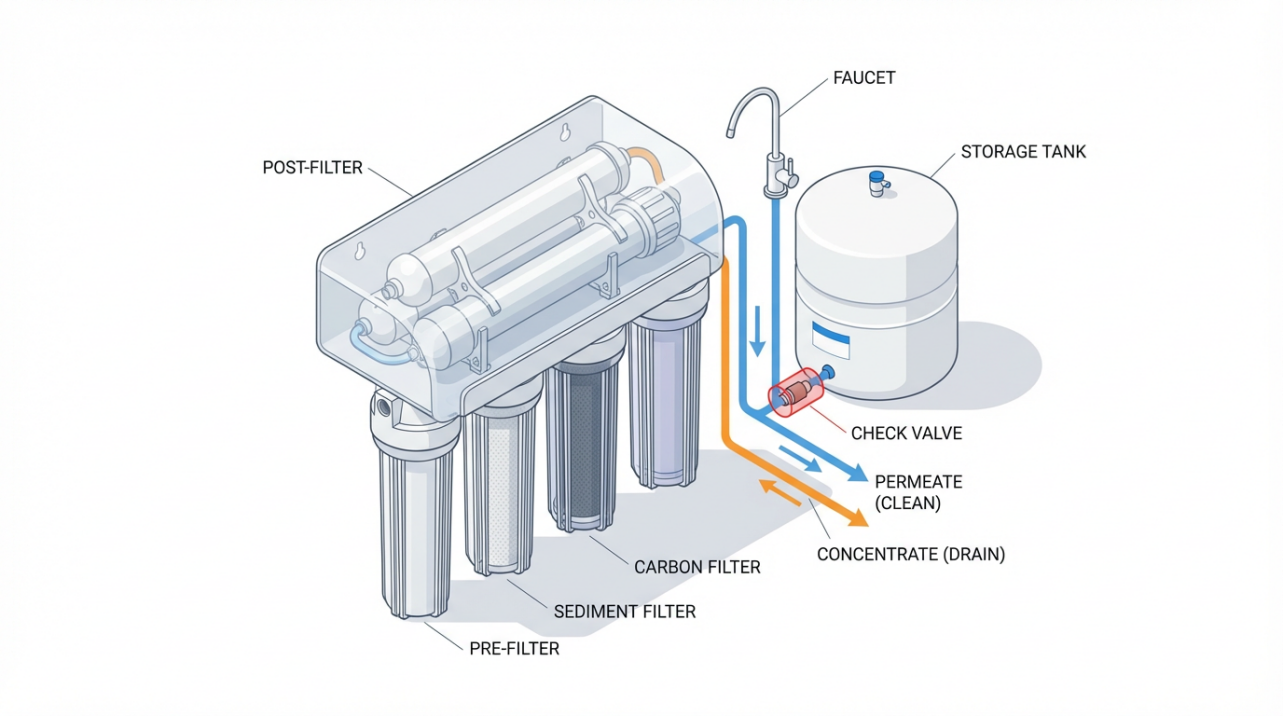
In a typical home RO setup, feed water passes through sediment and carbon pre‑filters, enters the RO membrane housing, then splits into two paths. The permeate line sends purified water toward a pressurized storage tank and a final polishing filter before reaching your faucet. The concentrate line carries the rejected contaminants to a drain line. Unlike a standard cartridge filter that traps everything inside, RO uses crossflow filtration: some water passes through the membrane while the rest sweeps contaminants along the surface and out to drain.
Pressure is the driving force. For home systems, manufacturers such as NU Aqua note that their under‑sink units often operate best when incoming pressure is in the range of about 45 to 80 psi without a pump. Industrial RO treating brackish or seawater can run at much higher pressures, in the hundreds of psi, according to engineering discussions from Trimteck and Puretec Industrial Water. Regardless of scale, valves throughout the system control how that pressure is applied and how water moves.

Among these valves, the humble check valve is the guardian of one‑way flow.
What Exactly Is a Check Valve in an RO System?
A check valve is a self‑acting one‑way valve. Resources from Tameson and Wisnex describe it as a non‑return valve or back‑pressure valve that allows flow only in one direction and automatically closes when flow tries to reverse. There is no handle or lever to turn. Instead, the internal mechanism responds to the pressure and flow of the water itself.
In RO systems, check valves usually rely on a simple internal disc, ball, or similar element that lifts when upstream pressure exceeds a certain minimum opening point, often called cracking pressure. Wisnex highlights cracking pressure as a key parameter: if upstream pressure is too low, a conventional check valve may not open fully, which can restrict flow and reduce system efficiency. When pressure on the downstream side rises or upstream pressure drops, the internal element moves back to the seat, sealing the passage and blocking reverse flow.
From a high‑level water‑treatment perspective, Smart Products USA notes that check valves are frequently installed on the outlet side of centrifugal pumps to prevent backflow and keep pumps primed. In RO applications specifically, the stakes are higher than simple convenience. The check valve helps protect the delicate RO membrane, prevents contamination of stored product water, and allows other automatic valves to function properly.
Where Check Valves Sit in a Typical RO Setup
The exact layout depends on your brand and model, but manufacturers describe a few consistent check valve locations in RO systems.
Pure Water Products explains that a small check valve is installed in the permeate line as water leaves the membrane housing. It may be a tiny insert hidden inside an elbow fitting at the membrane outlet, or it may be a larger inline check valve between the membrane outlet and the automatic shutoff valve connection that leads to the storage tank. Wisnex similarly notes that in household RO purifiers, the check valve is mounted between the RO membrane outlet and the pure water pressure tank, making it the first component pure water touches after leaving the membrane.
Pure Water Products also describes a separate check valve that can be placed in the drain line. Its role is to prevent wastewater from flowing back into the RO unit if the sink drain becomes clogged. This is not always present from the factory on every system, but their guidance emphasizes that adding a drain‑line check valve can provide extra protection against contaminated backflow.
Beyond household systems, Smart Products USA points out that in larger water treatment installations, such as desalination or ozone purification systems, check valves commonly sit on pump outlets and other strategic points to maintain system prime and keep flow moving in the correct direction.
You can think of these valves as one‑way gates located at critical junctions. The permeate‑side check valve guards the road between membrane and tank. The optional drain‑line check valve guards the road between your home’s drain plumbing and the RO waste line. In broader water treatment, check valves guard pump outlets and sensitive equipment.
The table below summarizes several of these roles using information from manufacturers and engineering sources.
Check valve location |
Description from sources |
Main purpose in RO context |
Membrane permeate outlet to storage tank |
Pure Water Products and Wisnex describe a one‑way valve immediately as permeate leaves the membrane housing. |
Prevent reverse flow from the pressurized tank back into the membrane and provide a firm barrier for shutoff. |
Permeate line between membrane and shutoff tee |
Pure Water Products notes inline check valves placed before the tee that feeds the storage tank and automatic shutoff. |
Maintain one‑way flow toward the tank and allow the automatic shutoff valve to sense back pressure. |
Drain line to household plumbing |
Pure Water Products installs a check valve in the drain line to stop contaminated drain water from backing into the RO. |
Protect the RO unit from backflow if the sink drain clogs or backs up. |
Pump outlet in larger water‑treatment systems |
Smart Products USA reports check valves on pump outlets in desalination, purification, and sampling systems. |
Keep pumps primed, prevent reverse flow through pumps, and protect downstream equipment. |
Why Check Valves Matter for Water Safety and System Health
Preventing Backflow and Protecting Stored Water
North American Trade Source defines the basic function clearly: the check valve ensures one‑way flow and prevents backpressure from pushing water backwards into the RO membrane. If water in the storage tank could freely push back into the membrane and pre‑filters, you would risk mixing older water with fresh, potentially spreading contamination and stressing components that are designed for forward flow.
The same source warns that operating an RO system without a check valve is not recommended. They caution that reverse water flow can damage components and contaminate stored water. Pure Water Products further emphasizes that the permeate‑side check valve keeps back pressure from the tank away from the membrane and creates the solid barrier that the automatic shutoff valve needs in order to work. Without this one‑way barrier, even a well‑designed RO unit may run continuously, wasting water and eroding performance.
The drain‑line check valve described by Pure Water Products addresses a different contamination scenario. If the household drain becomes clogged and backs up, there is a risk that dirty water could flow backwards through the RO drain tube. An inexpensive check valve in the drain line acts as a gate that blocks that reverse flow, preserving the cleanliness of the RO piping and membrane housing.
Enabling Automatic Shutoff and Saving Water
Many home RO owners first become aware of check valves when something goes wrong with automatic shutoff. LiquaGen explains that automatic shutoff (ASO) and check valves together allow an RO system to start and stop water production automatically based on the status of a float valve or pressurized storage tank. When the tank or bin is full, the float valve or tank pressure triggers the shutoff, and both the product and waste flows stop. When water is drawn and the level drops, the valves reopen, and production resumes.
LiquaGen notes that in permanent installations with constant feed water and storage, ASO and check valves are essential. Without them, water continues to run through the waste line even when the product line is closed or the tank is full, leading to continuous and unnecessary water loss. This is why some of their portable units omit these valves; on portable units without storage, the flow behavior and tradeoffs are different, and including ASO and check valves would reduce product flow unnecessarily.
Pure Water Products explains that if the permeate‑side check valve fails or is missing, the RO unit will not shut off correctly when the tank is full. The system may keep producing water and sending concentrate to drain indefinitely, wasting water and eventually damaging the membrane through constant operation. In their description, the check valve is not optional; it is the foundation on which the automatic shutoff mechanism relies.
The diagnostic guides from NU Aqua and APEC Water show this interaction in real troubleshooting. NU Aqua describes how continuous water drainage, where the drain line never stops running, is typically a sign of malfunction involving the automatic shutoff valve, the check valve, or the tank pressure. Their procedure involves using the tank valve and feed valve to test whether the system can shut off when the tank is simulated as full. If the drain continues to run when it should be quiet, either the ASO or the check valve is failing. APEC’s troubleshooting of a pumped RO system reaches the same conclusion: if the drain continues flowing during their shutdown test, the internal check valve at the membrane’s product outlet is likely bad, allowing backflow from the tank toward the drain and preventing the tank shutoff and electric shutoff valves from closing.
In short, the check valve’s one‑way action is what allows back pressure from the tank to build up in the right place so the shutoff valves can see it and stop the system. Without that, your RO behaves like a small open tap to the drain, running almost constantly.
Protecting Membranes, Pumps, and Other Components
RO membranes are delicate, high‑value components. According to maintenance guides from Air Water & Ice, Frizzlife, and other manufacturers, membranes are expected to last on the order of several years when protected by proper pre‑filtration and correct operation. Continuous operation or repeated pressure shocks can shorten this lifespan considerably.
Pure Water Products warns explicitly that a missing or failed permeate check valve, by preventing proper shutoff, not only wastes water but can eventually damage the membrane through constant duty. Trimteck, in its overview of valves in RO systems, notes that check valves protect both pumps and membranes from backflow in complex RO trains. Smart Products USA likewise highlights the role of check valves in protecting centrifugal pumps by preventing reverse flow that can sap prime or cause damage.
At the household level, North American Trade Source notes that backflow allowed by a broken check valve can prevent pressure from building properly and can damage components in the system. Crystal Quest’s reverse osmosis tank cleaning guide adds that a tank that refuses to fill may indicate a ruptured bladder or a faulty check valve, alongside other causes such as incorrect tank air pressure.
Across all of these sources, the theme is consistent. The check valve is a small, relatively inexpensive part that helps preserve the integrity of the entire RO train by keeping pressure and flow moving in the intended direction.
Managing Flow Under Low Pressure
Not every home enjoys strong city water pressure. Wisnex points out that in regions with low upstream water pressure, conventional check valves used in RO systems can become a bottleneck. Because every check valve has a cracking pressure, if the feed pressure is only slightly above that threshold, the valve may not open fully. This limited opening can restrict flow and reduce system efficiency, sometimes making an already slow RO system feel even slower.
To address this, Wisnex reports that they developed patented large‑flow check valves, available in both straight and elbow configurations, specifically to maintain good performance even when supply pressure is relatively low. Their internal testing showed that these large‑flow models can sustain adequate flow in pressure‑challenged installations, where standard check valves might struggle.
For a homeowner with persistently slow RO performance despite fresh filters and correct tank pressure, the choice of check valve can therefore matter, especially in areas known for low municipal pressure.
Everyday Symptoms of Check Valve Problems
Because check valves work silently in the background, it is easy to overlook them when things go wrong. Yet several common RO symptoms have a check valve either at the root of the problem or as a contributing factor.
The RO Runs Constantly or the Drain Never Stops
NU Aqua describes a healthy RO system as one in which the drain line runs while the tank is filling and then stops when the tank reaches full pressure. When the drain continues to run even after long periods of no water use, something is wrong. They point to the automatic shutoff valve, the check valve, and the tank air pressure as the primary culprits for continuous drainage.
Their troubleshooting method is straightforward but revealing. After drawing some water from the RO faucet, you close the valve to the storage tank so that the system believes the tank is full. After waiting a few minutes, you check whether the drain line has stopped. If the drain still runs, the system is not shutting off as it should. NU Aqua then describes a follow‑up test where the feed water is off, the tank valve is open, and the drain line is disconnected briefly. If water continues to flow steadily from the disconnected drain line in this configuration, the check valve is likely stuck open or broken, allowing tank water to backflow toward the drain.
APEC’s troubleshooting guide for a pumped RO system uses a very similar logic. Their documentation refers to an internal check valve at the membrane’s product outlet, along with an electric shutoff valve and a tank shutoff valve. During their test, if water continues to drain with feed water closed and the tank valve open, they conclude that the internal check valve is bad and recommend replacing it. If no water drains in that condition, the check valve is working, and attention shifts to the other shutoff valves.
LiquaGen’s overview of auto shutoff and check valves adds another perspective: systems that were built without a check valve or auto shutoff, especially simple portable RO units, will simply continue sending water to drain whenever feed is turned on. That makes sense for some portable setups without storage, but in a permanent under‑sink installation, this behavior is a sign that key valves are missing or malfunctioning.
The Storage Tank Will Not Fill or Pressure Is Weak
North American Trade Source notes that when water is not held properly and pressure cannot build up, the RO system may fail to push water into the storage tank. They explain that a stuck or broken check valve can cause these symptoms, because reverse flow or leakage across the valve prevents the tank from reaching the pressure needed for normal operation.
Crystal Quest’s storage tank guide points out that low water pressure at the RO faucet commonly reflects either a low air charge in the bladder tank or issues with internal components such as the bladder or check valve. They recommend an empty‑tank air charge of about 7 to 10 psi for their typical 3 to 4 gallon under‑sink tanks. Frizzlife and NU Aqua converge on a similar target, advising homeowners to set empty‑tank pressure around 7 to 8 psi using a low‑pressure gauge. If tank air pressure is badly off, the symptoms can mimic valve problems, so both need to be checked.
Practically, this means that when an RO tank is not filling properly, you should think about both the tank air charge and the check valve. If air pressure is correct yet the tank still behaves as if pressure cannot build, inspection of the check valve becomes even more important.
Reverse‑Flow Cleaning and Check Valves
In more specialized contexts, such as hobby maple syrup production using RO units, some users experiment with reverse‑flow cleaning of membranes. A discussion among maple syrup enthusiasts highlighted a key point: a check valve on the line you are trying to backflush will simply block that reverse flow. As community members pointed out, any cleaning procedure that relies on intentionally reversing flow through a membrane must either remove the check valve from that line, bypass it, or otherwise account for the one‑way nature of the valve. This is a reminder that check valves are designed to resist exactly the kind of flow that some cleaning methods attempt to create.
For most homeowners using standard RO units, this is a theoretical point rather than a daily concern.

But it underscores how fundamental and non‑negotiable the one‑direction behavior of a check valve truly is.
Choosing and Replacing Check Valves
Matching Style, Size, and Flow Direction
In consumer RO systems, check valves come in several different packages. Pure Water Products describes two common forms. One is an inline check valve installed in the tubing between the membrane outlet and the tee that feeds the storage tank and automatic shutoff valve. The other is an insert‑style valve pushed into the elbow fitting attached directly to the membrane permeate port. They note that elbow fittings themselves vary by brand, such as gray John Guest fittings versus white Jaco fittings, and that the insert check valve must be matched to the fitting style and size.
North American Trade Source adds a practical note about installation. They state that many users can install a check valve themselves, provided they follow basic installation steps and confirm the correct flow direction. They stress that the system should never be run without a functioning check valve, because reverse flow can damage the system and contaminate stored water. When in doubt, they recommend seeking professional guidance or consulting detailed installation resources.
Tameson reminds engineers and technicians that valve selection in RO systems should consider not only correct port size and thread standard, but also materials that resist corrosion in chloride‑rich and chemically treated water. They highlight stainless steels and suitable plastics as good choices, while warning that standard brass can be problematic in chloride environments due to dezincification. While their comments cover a wide range of RO valves, including solenoids and ball valves, the same material considerations apply to check valves that will sit in contact with RO water, brine, or chlorinated feed.
Retailers such as iSpring offer dedicated check valve components with standard quick‑connect fittings, for example with one‑quarter inch tubing connections, making it easier for homeowners to replace a failed valve with a compatible part.
The key takeaway is simple. When replacing a check valve, you should match both the physical style and the flow direction indicated by arrows or markings on the body. A check valve installed backwards behaves like a closed valve in normal operation and can completely block product water from reaching the tank.
Lifespan and Replacement Timing
North American Trade Source gives a useful rule of thumb for check valve life in RO systems: typically about two to five years, depending on water quality and how frequently the system is used. They suggest that regular inspections can extend effective life by catching wear early. In their guidance, a check valve is treated much like a consumable: inexpensive compared to a membrane, but essential to replace before failure causes bigger problems.
Broader RO maintenance guides add context to this interval. Frizzlife outlines a schedule where pre‑filters are replaced every six to twelve months, post‑filters and system sanitization are performed about once per year, and membranes are changed every two to seven years depending on hardness and measured TDS rejection. Air Water & Ice suggests sediment and carbon filters every six to twelve months, with membranes typically lasting two to five years, again depending on source water and usage.
While these schedules focus on filters and membranes, they also provide convenient anchor points for checking valves. It makes sense to inspect check valves whenever you already have the system depressurized for filter changes or annual sanitization. Symptoms such as tanks that do not fill, systems that refuse to shut off, or continuous drain flow are strong signals that replacement should not be delayed.
When to Involve a Professional
Although some check valve replacements are straightforward, several sources encourage involving a professional in specific scenarios. North American Trade Source notes that if you are uncertain about installation steps or flow direction, consulting professionals or detailed manufacturer guidance is wise. NU Aqua recommends professional help if continuous drainage or other issues persist after basic troubleshooting, if problems recur frequently, or when installing or upgrading complex RO systems. APEC, when diagnosing failures in pump‑driven systems involving an electric shutoff valve, tank shutoff valve, and internal check valve, recommends contacting the manufacturer or a qualified service provider to replace paired components such as tank and electric shutoff valves.
From a water wellness perspective, I always encourage homeowners to be realistic about their comfort level. If you are confident identifying tubing lines, depressurizing the system, and working with quick‑connect fittings, a permeate‑line check valve replacement may be within reach. If your system includes pumps, multiple outlets such as ice makers and coffee machines, or complex valve blocks, partnering with a professional can protect both your equipment and your peace of mind.
Pros and Cons of Check Valves in RO Systems
Check valves are not optional in a healthy RO system, but it is still useful to understand their benefits and tradeoffs.
On the positive side, nearly every technical source agrees on the core advantages. Check valves preserve one‑way water flow, protecting the membrane, storage tank, and upstream filters from reverse pressure. They make automatic shutoff possible by holding back pressure so ASO valves, tank shutoff valves, or electric shutoff valves can sense when the tank is full and stop production, saving water and reducing wear. They prevent contaminated water in drains or process lines from migrating back into cleaner sections of the system. For pumps, they help maintain prime and prevent damaging reverse flow. Pure Water Products even highlights how small and inexpensive the typical RO check valve is, relative to the important role it plays.
On the challenge side, several themes emerge from manufacturer reports and troubleshooting guides. First, because they are mechanical components with moving parts, check valves can fail either open or closed. When they fail open, systems may never shut off, wasting water and stressing membranes, as described by Pure Water Products, NU Aqua, and APEC. When they fail closed or partially closed, tanks may not fill, leading to low flow and frustrating performance, as noted by North American Trade Source and Crystal Quest. Second, Wisnex notes that under low upstream pressure, conventional check valves can significantly limit flow. This is why special large‑flow check valves have been developed for pressure‑challenged installations. Finally, the one‑way nature of check valves can complicate any cleaning or maintenance procedure that depends on intentional reverse flow through a membrane or line. As the maple syrup maker’s question and community responses illustrated, check valves must be removed, bypassed, or otherwise accommodated if you want to backflush a membrane, because they are designed specifically to prevent that reverse flow.
Despite these challenges, the consensus from water treatment engineers and RO manufacturers is that the benefits of check valves far outweigh their drawbacks. Their vulnerabilities can be managed through proper sizing, appropriate model selection for low‑pressure conditions, and scheduled inspection and replacement.
Integrating Check Valve Care into Your RO Maintenance Routine
Most RO maintenance guides focus on filters, membranes, tank pressure, and sanitization. By weaving check valve awareness into those same touchpoints, you can protect your water quality and system investment without much extra effort.
When you perform routine filter changes, as recommended by providers such as Frizzlife, Air Water & Ice, and Licleanwater, your system will already be depressurized. This is an ideal time to visually inspect the permeate‑side check valve. Confirm that the valve is present where your system schematic says it should be, that it is installed in the correct flow direction, and that tubing connections are snug without signs of leakage. Bluonics and other maintenance resources stress the value of careful leak checks around all housings and fittings after service. Including the check valve connections in that leak check is a simple but valuable habit.
During annual system and tank sanitization, Crystal Quest and Frizzlife recommend draining the tank completely, introducing a sanitizing solution through appropriate housings, letting it sit for the recommended contact time, and then flushing and refilling until no sanitizer odor remains. These procedures naturally expose how well your system shuts off and refills. If, after sanitization and filter replacement, you notice continuous drain flow or a tank that refuses to fill, treating the check valve as a suspect from the outset can save time.
Whenever you adjust or verify tank pressure, as NU Aqua and Frizzlife advise, pay attention to how the system behaves afterward. With the tank empty and air pressure set around 7 to 8 psi, a properly functioning check valve and shutoff assembly should allow the tank to refill and the drain to stop once full. If the tank pressure is correct yet the drain never stops or the tank seems to fill and empty in a strange pattern, the check valve may no longer be sealing correctly.
Finally, when you track performance over time using a TDS meter, as recommended by Frizzlife, you can also watch for indirect signs of valve trouble. A membrane that suddenly appears to be working harder than before, reflected in lower recovery or odd changes in permeate TDS despite fresh filters and stable feed water, may be operating under unbalanced flow conditions driven by valve issues upstream or downstream, including the check valve.
Short FAQ on RO Check Valves
What happens if I run my RO system without a check valve?
North American Trade Source warns that operating an RO system without a check valve can allow reverse water flow that damages components and contaminates stored water. Pure Water Products adds that without a functioning permeate‑side check valve, the automatic shutoff mechanism cannot work correctly, so the system may run continuously, wasting water and eventually harming the membrane. For these reasons, running without a check valve is strongly discouraged.
How long does a check valve last in a home RO system?
According to North American Trade Source, a typical service life for an RO check valve is about two to five years, depending on the quality of your water and how frequently the system cycles. They recommend periodic inspection and timely replacement to catch wear or malfunction early. In practice, it makes sense to evaluate the check valve during major maintenance milestones such as annual sanitization or membrane replacement.
Can I replace an RO check valve myself?
North American Trade Source notes that many users can install or replace an RO check valve themselves if they follow basic installation instructions and verify the correct flow direction. Pure Water Products explains that you must also match the style of valve to your fittings, for example choosing the right insert valve for a specific elbow or the correct inline valve for your tubing size. If you are unsure about identifying the valve, understanding the flow path, or confirming fit, NU Aqua and other providers recommend consulting a professional or contacting the manufacturer.
How do I know if my check valve is causing my RO to run nonstop?
Troubleshooting steps from NU Aqua and APEC show that if your RO’s drain continues to run even when the storage tank is full or the tank valve is closed, and especially if water flows from the disconnected drain line with feed water off and the tank valve open, the internal check valve is likely stuck open or broken. In that situation, the check valve no longer blocks backflow from the tank to the drain, preventing the automatic shutoff valves from seeing full tank pressure. Replacing the check valve is usually required, and on some systems it may be best to do this in conjunction with service on associated shutoff valves.
Closing Thoughts
Check valves do not look impressive next to shiny faucets or high‑tech membranes, but they quietly safeguard the direction, safety, and efficiency of every drop your RO system produces. By understanding where they sit, how they interact with automatic shutoff and tank pressure, and what symptoms point to trouble, you can keep this small component from becoming a big problem. As a Smart Hydration Specialist and Water Wellness Advocate, I encourage you to make check valve awareness part of your regular RO care so that every glass you pour is as safe, efficient, and reliable as the technology you invested in promises it to be.
References
- https://www.aquasana.com/info/3-tips-for-maintaining-a-home-reverse-osmosis-system-pd.html?srsltid=AfmBOopcsbwgx9L4hZ4BZPY33HHE8zX5HA5SMeavXFBpQNVEiS7ypMbT
- https://empoweringpumps.com/dft-why-check-valves-for-the-reverse-osmosis-industry/
- https://espwaterproducts.com/pages/reverse-osmosis-maintenance?srsltid=AfmBOopvzaXGGuF2rjWI1x_eagnGxkMg_HmYHTFYND10Fi3kRqivw8Ym
- https://www.ispringfilter.com/ac/ispring-acv1k-check-valve-for-reverse-osmosis-ro-systems?srsltid=AfmBOoq3QC87Gew1V_5PBpZ76eEdHGKKxhOkU_dEceS5npfPnch0F2G4
- https://licleanwater.com/guide-to-reverse-osmosis-system-maintenance/
- https://liquagen.com/products/auto-shut-off-check-valve-for-ro-systems
- https://natradesource.com/check-valve-for-reverse-osmosis-systems/
- https://www.pmmag.com/articles/106759-check-valves-explained-understanding-different-types-and-applications-in-backflow-prevention
- https://www.purewaterproducts.com/articles/reverse-osmosis-check-valves
- https://tameson.com/pages/valves-for-reverse-osmosis-systems

Share:
Understanding the Need for Solenoid Valves in RO Systems
Understanding How Much Chlorine Your RO System Can Really Handle