Clean drinking water should be simple to get, and an under-sink RO water purifier makes that happen right in your kitchen. While under-sink RO water purifier installation might sound scary, it's really just about following steps and not rushing through it. You'll save the cost of hiring someone else, plus you'll actually understand how your water system works when you need to change filters later. With a little patience, you can have the whole thing working in an afternoon.

Why Should You Install Your RO System Yourself?
Professional installation usually runs $200 to $500, so doing it yourself keeps that money in your pocket for better filters or other home projects. You also get complete control over the process – no rushing through steps or settling for placement that doesn't work perfectly for your kitchen.
The biggest advantage is understanding how your system actually works. When you need to change filters or fix a small issue later, you'll know exactly what to do instead of calling for help. You'll recognize which parts do what and how everything connects together.
This knowledge helps you catch problems early before they turn into expensive repairs. Many people find that after installing their RO system, they feel more confident handling other basic plumbing tasks around the house. It's a skill that keeps paying off over time.
What Do You Need Before Starting Your Installation?
Tools You'll Need
Having the right tools ready makes installation smooth and prevents frustrating delays. Most homeowners already have these basic items, but it's worth checking your toolbox before you start.
Check Your Box
Missing parts are surprisingly common with RO systems, and discovering this halfway through installation can ruin your entire day. Taking a few minutes to verify everything now saves major headaches later.
Stay Safe
Water and electrical systems don't mix well, and a few simple precautions prevent serious problems. These safety steps only take a few minutes but could save you from costly damage or injury.
- Turn off your home's main water supply before disconnecting any pipes or fittings.
- Switch off power to your garbage disposal at the circuit breaker if you have one under your sink.
- Wear safety glasses whenever you're drilling to protect your eyes from debris.
- Stop immediately and call a professional if you spot gas lines or any electrical issues under your sink.
Pick Your Spot
The location you choose affects how well your system works and how easy it is to maintain. Taking time to plan this properly makes the rest of installation much smoother.
- Find a spot near your cold water line, drain connection, and with adequate space for your specific unit size.
- Measure your available cabinet space first since some RO systems are larger than they appear in photos.
- Make sure you can still access existing shut-off valves and close your cabinet doors properly after installation.
- Consider mounting the storage tank in an adjacent cabinet if your main sink area feels too cramped.
How to Install Your RO System Step by Step
Now comes the hands-on part where your RO system transforms from a box of components into a working water filtration system. Each step builds on the previous one, so take your time and don't skip ahead. Most installations take 3-4 hours for first-timers, and that's perfectly normal.
1. Turn Off Your Water Supply
Shutting off your water properly prevents flooding and messy surprises when you start disconnecting pipes under your sink.
- Find your main water shut-off valve where the water line enters your house or near the water meter.
- Turn the valve handle clockwise until it stops completely.
- Open both hot and cold faucets at any sink to drain remaining water from your pipes.
- Wait until water stops flowing completely before starting work under your sink.
2. Put In Your New Faucet
Your RO faucet needs its own dedicated hole in your sink or countertop for the clean water line.
- Measure and mark the faucet location 6-8 inches to the side of your main faucet.
- Use a 1.25-inch hole saw to drill straight down through the surface.
- Insert the faucet stem from above with the rubber gasket flat against the surface.
- Tighten the mounting nut from underneath by hand first, then add a quarter turn with your wrench.
3. Hook Up to Your Cold Water Line
- Connect your system to the existing cold water supply using a tee fitting that splits the line.
- Locate and disconnect the cold water supply line from the shut-off valve under your sink.
- Wrap the tee fitting threads with 2-3 turns of Teflon tape wound clockwise.
- Screw the tee fitting onto the shut-off valve and tighten with your wrench.
- Connect your original supply line to the straight port and the RO input line to the side port.
4. Set Up the Drain Connection
Position the drain saddle clamp around the horizontal drain pipe under your sink, before it curves down into the trap. Tighten the saddle clamp screws alternately until secure against the pipe. Use a 1/4-inch drill bit to drill through the saddle hole and into the drain pipe beneath. Insert the drain fitting through the saddle and connect the black waste water tubing from your RO system.
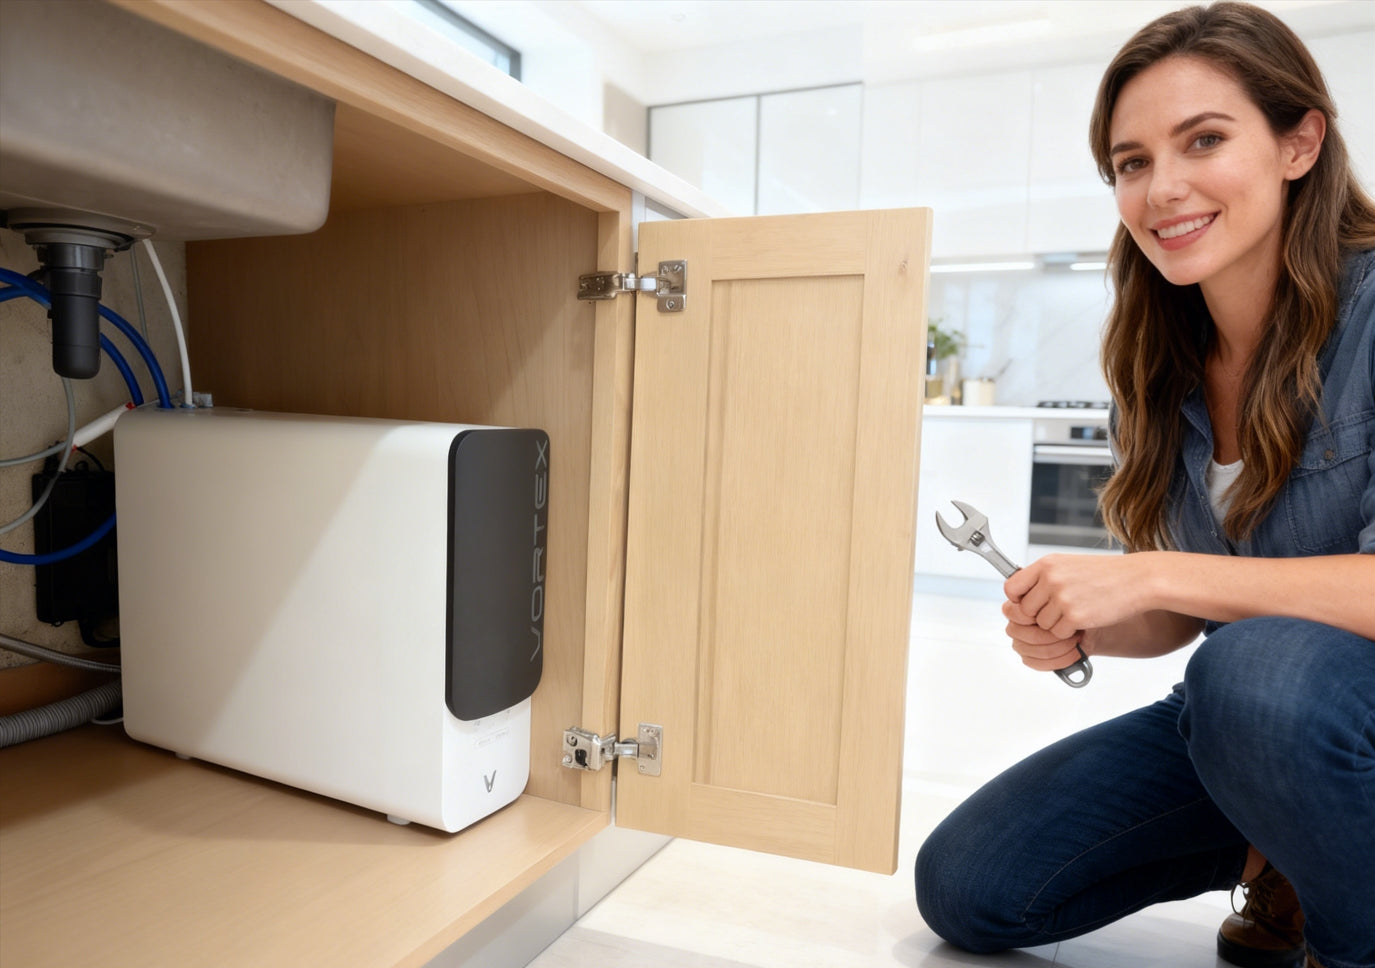
5. Mount Your Main Unit
6. Connect Your Storage Tank
Remove the plastic cap from your storage tank's threaded fitting and wind 3-4 turns of Teflon tape clockwise around the threads. Thread the tank shut-off valve on by hand, then snug with your wrench without over-tightening. Push the blue tubing from your RO system into the tank valve's quick-connect fitting until it clicks, then tug gently to ensure it's secure.
7. Install Filters and Connect Lines
Installing filters in the correct order ensures your system works properly and produces clean water.
- Open each filter housing by turning counterclockwise, using a filter wrench if needed.
- Insert filters in order: sediment first, then carbon pre-filter, RO membrane, and carbon post-filter.
- Hand-tighten each housing clockwise until the O-ring contacts, then turn an additional 1/4 turn.
- Connect colored tubing to matching fittings, pushing until each tube clicks into place.
8. Check for Leaks and Test Everything
The final testing phase ensures everything works correctly and identifies any connection issues before you finish.
- Slowly turn your main water supply back on and check every connection for drips.
- Open your RO faucet and run it for 10-15 minutes to flush the system.
- Check tank pressure with a tire gauge on the air valve (should read 7-8 psi when empty).
- Inspect all connections again after 30 minutes and once more after 24 hours of operation.
How to Keep Your RO System Running Properly
Regular maintenance is what separates a system that works great for years from one that starts producing bad-tasting water after just months. The good news is that RO maintenance is mostly about changing filters on schedule and doing occasional check-ups. Most tasks take just 15-30 minutes and don't require any special skills.
Your Filters and When to Change Them
Each filter in your RO system has a specific job and replacement schedule that keeps your water clean and tastes great.
- Your sediment filter catches dirt and rust and typically lasts 6-12 months depending on how dirty your incoming water is.
- Carbon pre-filters remove chlorine and bad odors, usually needing replacement every 6-12 months.
- The RO membrane removes dissolved contaminants and can last 2-3 years with proper maintenance.
- Carbon post-filters give your water final polishing and typically need changing every 12 months.
- Write replacement dates on your calendar or set phone reminders to stay on schedule.
How to Replace Each Filter
Filter replacement follows the same basic steps regardless of which filter you're changing.
- Turn off the water supply to your RO system and open the RO faucet to release pressure.
- For sediment and carbon filters, twist the housing counterclockwise and pull out the old filter.
- Insert the new filter and check that the rubber O-ring sits properly before threading the housing back on hand-tight.
- RO membranes require sliding out the old membrane and inserting the new one with rubber seals facing the right direction.
- Run water for 5-10 minutes after any filter change to flush out loose particles.
When to Clean Your System
Your RO system needs a thorough cleaning every 12-18 months to remove bacteria and biofilm that can build up over time. You'll know it's time when water starts tasting off, flow rates drop significantly, or you notice any slimy buildup in the storage tank. Use a food-grade sanitizing solution designed for RO systems, following the manufacturer's instructions for mixing and contact time. The process involves circulating the sanitizing solution through all parts of the system, letting it sit for the recommended time, then flushing thoroughly with clean water. Some people prefer to do this when they change their RO membrane since the system is already partially disassembled.
Checking Your Water Quality
Regular testing helps you catch problems early and know when filters need changing before your water quality suffers.
- Test your water every 6 months using TDS strips or a digital TDS meter (costs about $15-20).
- Good RO water should read 10-50 ppm compared to 150-500 ppm for typical tap water.
- Rising TDS numbers usually mean your RO membrane needs replacing soon.
- Pay attention to any changes in taste, smell, or clarity as early warning signs.
- Keep a simple log of test results so you can spot trends over time.
How to Make Your RO System Last Longer
A well-cared-for RO system can work great for 10-15 years and give you clean water the whole time. The trick is building simple habits that protect what you've invested and catch small issues before they turn into big, expensive problems. These easy steps take just a few minutes each month but can add years to how long your system works.
- Change your filters when they're due, even if the water still tastes good, because old filters can mess up other parts of your system.
- Check your home's water pressure once a month with a simple gauge since RO systems work best when you have 40-60 psi coming in.
- Add a pressure control valve if your house pressure goes over 80 psi to keep seals and connections from getting damaged.
- Keep your RO system away from hot stuff like water heaters, furnaces, or windows where sun hits it directly since heat can warp the plastic parts.
- Don't let the system freeze by wrapping pipes in cold areas or emptying it out if you're going away in winter.
- Take a quick look under your sink every month for water drips, loose connections, or tubes that look worn out.
- Swap out any tubing that has cracks, bends, or weird colors since these problems can make your water taste bad or hurt how well the system works.
- Wipe down your RO unit and storage tank once in a while to keep dust from building up and hiding problems you need to see.
Clean Water at Home With Your New Under-Sink RO Water Purifier
Learning how to install an under-sink RO water purifier yourself puts you in control of your water quality and saves serious money. Most people are surprised how straightforward the whole thing is once they dive in. Stay on top of maintenance, especially those filter swaps, and you'll have restaurant-quality water at home. Go ahead and tackle this project – clean, great-tasting water is just a weekend away.
Share:
Lead Contamination Tap Water: Test, Detect & Eliminate Today
Smart Hydration Revolution: Inside the VIOMI MASTER M1 AI-Powered Water Purifier